How to Tie a Magic Knot in Crochet
Some posts contain affiliate links. But have no fear! I only promote things I love and use myself.
The Magic Knot is a great skill to have in your tool box. It is faster than the Russian Join and leaves no tails to weave in from the change.
Talk about simplifying your scrap busters!

When done correctly, (practice, practice, practice!) this knot will hold for the life of the item AND you can cut off the tails RIGHT AT THE KNOT!
WHAT!?
Yep, you can tie two strands of yarn together, pull them tight, and then cut the tails right off, leaving only a small knot that is easy to work around as you crochet.
I recommend this method in two situations.
- When you run out of yarn and need to join to another skein of the same color.
This method allows you to simple work over the knot and keep going without losing momentum or adding ends to weave in.
- When you are making "Frankenskeins." (I did NOT coin this term, I just love it and use it a lot.)

One method of using up your yarn scraps or "scrap busting" is to make one giant ball of yarn out of all the short pieces of yarn that were too long to throw away but too short to make a Mini Owl. You can use the Magic Knot to tie them all together and use your Frankenskein to make new, colorful projects that do not require weaving in any ends!
Note: While these patterns were originally released monthly, life got in the way, as it tends to do. You will still receive all twelve patterns, but now the membership ends February 28th, 2022, and I promise to have all 12 patterns to you by that date. 🙂
Magic Knot Video Tutorial
This tutorial features Red Heart Super Saver yarn.
Note: While these patterns were originally released monthly, life got in the way, as it tends to do. You will still receive all twelve patterns, but now the membership ends February 28th, 2022, and I promise to have all 12 patterns to you by that date. 🙂
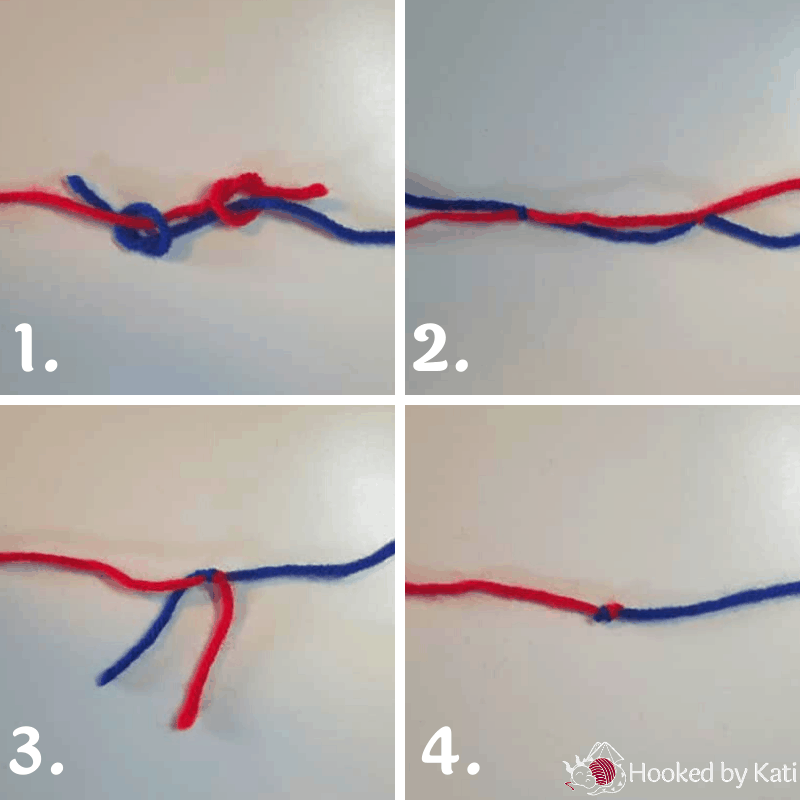
The Magic Knot: Step By Step
- Tie a knot with Strand 1 AROUND Strand 2. Then repeat making a knot with Strand 2 AROUND Strand 1. The two strands will never be tied together — they will each tie around the other.
- Pull the knots tight.
- Pull the working ends of both strands until the knots butt against each other tightly. They will pull each other together as the yarn is pulled.
- Cut the tails off at the knot.
If done correctly, this will create two knots that only pull each other tighter when either side of the join is pulled.
So here is your challenge! Get started on a Frankenskein of your scraps. I keep an ongoing ball near my desk and any time I have left over yarn (of the same weight as my Frankenskein), I add to it.
When you are done, you can use your Frankenskein in place of any continuous strand of yarn to make anything!
Perhaps a REALLY colorful Llama is in order.
Or maybe a technicolor Guineacorn!
The possibilities are endless!
But remember, the more random the color combinations in your Frankenskein, the better it will look. 🙂
Have fun! And post pictures of your Frankenskeins (and your Frankenskein monsters!) in the Facebook Group or on Instagram with the hashtag #hookedbykati!
Have more questions? I'm always here to help!

Yarn on,
Kati
(Visited 1,358 times, 13 visits today)
Kati is the designer behind Hooked by Kati. With thousands of patterns sold around the world, Kati prides herself in creating innovative, easy-to-follow amigurumi patterns. She has designed for several publications, including Crochet!, Crochet World, Simply Crochet, and I Like Crochet. Kati finds her inspiration in science fiction, video games, and numerous visits to the zoo — all passions she shares with her husband and two boys.
How to Tie a Magic Knot in Crochet
Source: https://www.hookedbykati.com/how-to-tie-the-magic-knot-with-video-tutorial/

0 Response to "How to Tie a Magic Knot in Crochet"
Post a Comment